Cat eye nails are officially one of the hottest nail trends taking over 2025 and 2026. They’re bold, shimmery, and hypnotic — yet surprisingly easy to do at home. With a special magnetic polish and a simple magnet, you can create a moving, light-reflecting pattern on your nails that mimics the glowing depth of a real cat’s eye gemstone. Here’s everything you need to know to master this magical manicure.
Why Cat Eye Nails Are So Captivating
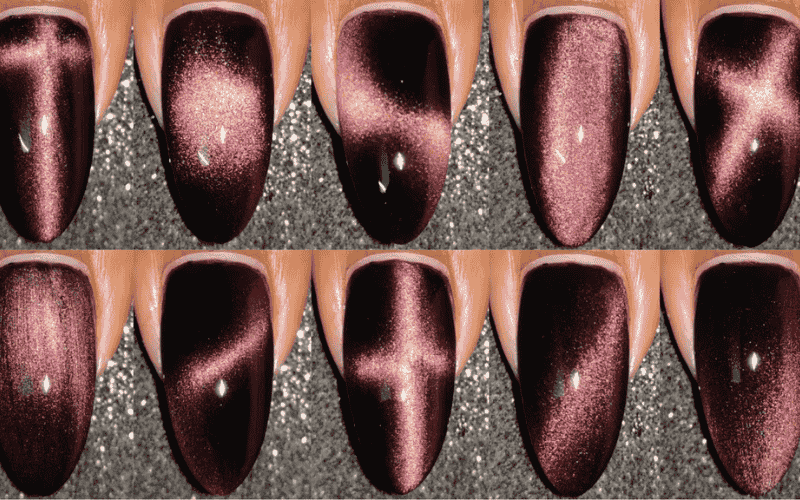
What makes cat eye nails so special is the way they catch light. The magnetic particles inside the gel create a concentrated shimmer stripe that appears to shift and move every time you tilt your hand. The result looks deep, dimensional, and almost liquid — like a piece of jewelry on your fingertips. Unlike hand-painted art that can take 5-15 minutes per nail, a cat eye pattern is created in just 10-30 seconds with a magnet, delivering high-impact results with minimal effort. The trend has become so popular that Amazon reports over 9,300 average monthly sales for cat eye gel polish sets, with a 20% year‑on‑year growth forecast through 2026.
Choosing the Right Cat Eye Polish
Not every polish will give you a true cat eye effect. You need a specially formulated cat eye gel polish — regular gel polish simply cannot achieve this result. The secret ingredient is tiny magnetic particles (often iron powder) suspended in the gel. When you hold a magnet close, these particles align along the magnetic field, creating the visible shimmer pattern. When choosing your first cat eye colors, look for a high magnetic particle density — this creates sharper, more visible lines and is more forgiving while you’re still learning the technique. For base colors, deeper shades like black, chocolate brown, deep burgundy, or navy create the most dramatic contrast between the shimmer stripe and the surrounding polish, making the cat eye effect truly pop. Black is the classic high-contrast choice, while brown produces a warm, honey-like glow.
Different Types of Nail Magnets and How to Choose
The magnet you use determines the pattern you create. Here are the most common types:
- Bar/Rectangular magnet: The most versatile and beginner-friendly. Creates the classic straight cat eye line down the center of the nail. Ideal for sharp, defined patterns.
- Round magnet: Creates circular patterns, starbursts, velvet effects, and nebula swirls.
- Cylindrical wand: Often used for the “velvet effect” — a soft, diffused glow across the entire nail rather than a single line.
- Dual-ended or multi-function magnets: Some tools feature multiple tips (heart, wave, grid) for complex patterns like flowers, four-leaf clovers, and S‑arc designs.
For best results, choose a magnet made of neodymium, a rare-earth magnet that provides a very strong magnetic field. Standard black ferrite magnets often aren’t strong enough to move the particles decisively, resulting in faint, muddy effects.
Step-by-Step Guide to Achieving Cat Eye Nails
Step 1: Prep your nails thoroughly. Clean your nails, push back cuticles, lightly buff the surface to remove shine, and wipe away all dust and oils. Apply a thin gel base coat and cure it under your UV/LED lamp.
Step 2: Apply a dark base color (optional but recommended). For maximum contrast, apply one coat of a deep shade like black or brown, cure it, then proceed. The darker the base, the more dramatic the final cat eye effect will be.
Step 3: Work one nail at a time. This is the most critical rule. Apply a medium-thick coat of cat eye gel polish to just one nail. If your layer is too thin, there won’t be enough magnetic particles to form a visible stripe.
Step 4: Use the magnet. Before curing, hold your chosen magnet 2-3mm from the wet polish. Do not let it touch the nail. For a classic straight line, hold the bar magnet flat and parallel above the center of the nail for 5-10 seconds. For a softer velvet effect, circle a round magnet slowly around the nail for 10-15 seconds or wave a cylindrical wand along the sidewalls.
Step 5: Flash cure immediately. As soon as you see your desired pattern, cure the nail for 5-7 seconds. This locks the magnetic particles in place before they can drift. If you delay, the effect will blur or fade. Repeat the process — apply cat eye gel, magnetize, flash cure — on each remaining nail, one at a time.
Step 6: Cure fully and seal. Once all nails are flash-cured, apply a full layer of gel top coat (cap the free edge) and cure fully for 60-90 seconds. Wipe away any sticky residue with alcohol, then apply cuticle oil.
Care Tips to Make Your Cat Eye Nails Last
A properly applied gel cat eye manicure can last 2-4 weeks. Here’s how to extend its life:
- Always cap the free edge with base coat, cat eye gel, and top coat. Sealing the tip is the single most effective step for preventing lifting and chipping.
- Use a quality top coat. A standard top coat can flatten the 3D shimmer effect — look for a diamond or high-shine top coat specifically formulated for cat eye services.
- Apply cuticle oil daily to keep your nails hydrated and flexible.
- Wear gloves for chores. Water and harsh chemicals are the fastest route to premature lifting.
- Avoid using your nails as tools. No opening cans or peeling stickers.
- Use a non‑acetone top coat when refreshing — acetone can dull the magnetic effect and fade pigments over time.
The Bottom Line
Cat eye nails deliver a high-impact, salon‑quality look without requiring advanced nail art skills. With the right magnetic polish, a strong neodymium magnet, and the one‑nail‑at‑a‑time technique, you can create stunning 3D effects that look different under every light. A little practice and proper aftercare will keep your nails looking mesmerizing for weeks.
Have you tried cat eye nails? Share your experience or favorite magnet technique in the comments — I’d love to hear what works for you.
Read also: The Complete Guide to Gel Manicure: Long-Lasting, High-Shine Nails at Home